Notice: Undefined index: limited_lang in /home/beaczwhx/dggulaitutorial.com/wp-content/plugins/code-syntax-highlighter/inc/src/rendrer.php on line 297
Hello coders, welcome to my new OpenCV Play Video In Python Tutorial. In this tutorial, you will learn to play video using opencv in python. This is very interesting tutorial, so let’s get started without any delay.
OpenCV is a very popular library for computer vision. The best thing of opencv is that we can apply various operations on videos. But still if you haven’t installed opencv then first follow the following tutorial to get started with opencv.
How To Install OpenCV In Python
Playing video using opencv is very easy and also enjoyable. This takes only some steps of codes to play video. We can also play videos in different ways like playing video in grayscale, in multiple frames etc.
You will learn following topics –
- How to play video?
- How to access camera?
- Playing multiple videos in one window etc.,
Contents
OpenCV Play Video In Python Tutorial
Let’s get start this play video using python tutorial.
Importing required modules
First of all we have to import all the modules which are required to play video using opencv. Write the following code to import modules.
import numpy as np
import cv2
Specifying Path
Now we will specify the path where our video is located. Write the following code to specify path.
video_path = r'C:\Users\HP\Pictures\camera\Camera\SampleVideo_1280x720_2mb.mp4'
- This is the path where my video is located. You have to specify your path of video.
Capturing video
Now we have to capture the video. VideoCapture() method is used to capture the video in opencv. Following is the code.
cap = cv2.VideoCapture(video_path)
- Here we have called VideoCapture() method of OpenCV and passed path of video as an argument.
Reading And Playing Video
Now we will start reading the video. Write the following code to read and play the video.
if (cap.isOpened()== False):
  print("Error opening video file")

while(cap.isOpened()):

  ret, img_frame = cap.read()

  if ret == True:
      img = cv2.resize(img_frame, (500,300))
      cv2.imshow('My Video Player', img)

      if cv2.waitKey(20) & 0xFF == ord('o'):
        break

  else:
    break
cap.release()

cv2.destroyAllWindows()
- First of all we have checked opening of camera. If camera is not opened then it will print a message “Error Opening Video File”.
- Now we have used while loop to read the video. This loop will continue until video capturing is open.
- Then we have read the frame from what our video is capturing. This is the process of opencv read video frame by frame. ret, img_frame = cap.read() is used to do this. This will go until ret==True.
- Then we have resized the frame using opencv’s resize() method.
- Now we have displayed the image using imshow() method.
- Then we will wait after displaying one frame. So we have used waitKey() function to wait. And also used 0xFF == ord(‘o’) to exit from the window. If we will not do it then the video will continue. Then we have break the if statement.
- Then braked the loop.
- Then we have released the video capture object using release() method.
- And at last we have closes all the windows using destroyAllWindows().
Complete Code Of Python OpenCV Play Video
import numpy as np
import cv2
video_path = r'C:\Users\HP\Pictures\camera\Camera\SampleVideo_1280x720_2mb.mp4'
cap = cv2.VideoCapture(video_path)

if (cap.isOpened()== False):
  print("Error opening video file")

while(cap.isOpened()):

  ret, img_frame = cap.read()

  if ret == True:
      img = cv2.resize(img_frame, (500,300))
      cv2.imshow('My Video Player', img)

      if cv2.waitKey(20) & 0xFF == ord('o'):
        break

  else:
    break
cap.release()

cv2.destroyAllWindows()
Output
Now run the above code to check the output.
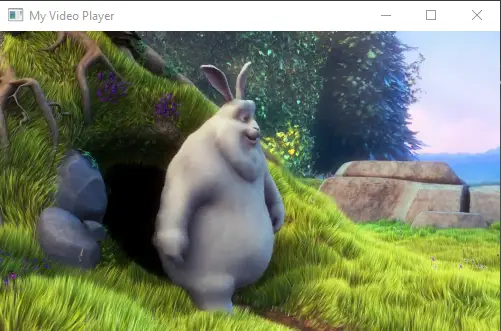
So guys we have played video successfully.
Now move further in Python OpenCV Play Video In Jupyter Notebook Tutorial.
Live Streaming Using OpenCV In Python
Now we will learn to access our system camera and live streaming.
To do this we have to pass 0 as argument to the VideoCapture() method.
import numpy as np
import cv2
cap = cv2.VideoCapture(0)

if (cap.isOpened()== False):
  print("Error opening video file")

while(cap.isOpened()):

  ret, img_frame = cap.read()

  if ret == True:
      img = cv2.resize(img_frame, (500,300))
      cv2.imshow('My Video Player', img)

      if cv2.waitKey(20) & 0xFF == ord('o'):
        break

  else:
    break
cap.release()

cv2.destroyAllWindows()
Output
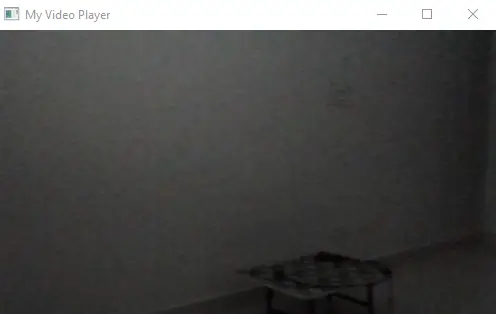
So we can access our system’s camera successfully using opencv module in python.
Playing Multiple Videos In One Window
For playing multiple videos in one window, we will use python numpy module.
Here we have used two methods of numpy hstack() and vstack() to form a grid. Write and run following code to play multiple videos in one window.
import numpy as np
import cv2
video_path = r'C:\Users\HP\Pictures\camera\Camera\SampleVideo_1280x720_2mb.mp4'
cap = cv2.VideoCapture(video_path)

if (cap.isOpened()== False):
  print("Error opening video file")

while(cap.isOpened()):

  ret, img_frame = cap.read()

  if ret == True:
      frame_1 = cv2.resize(img_frame, (200,200))
      frame_2 = np.hstack((frame_1, frame_1))
      frame_3 = np.vstack((frame_2, frame_2))

      cv2.imshow('My Video Player', frame_3)

      if cv2.waitKey(25) & 0xFF == ord('o'):
        break

  else:
    break
cap.release()

cv2.destroyAllWindows()
Output

So guys I am wrapping this Python OpenCV Play Video In Jupyter Notebook From Scratch tutorial here. I hope you will have learned playing video using opencv in python very well. But if you have still any doubt then feel free to ask your queries in comment section. I will be happy to help you. In next tutorials we learn more topics of opencv. You can also tell me which tutorial you need most. And at last don’t forget to give your feedback about this Tutorial and share this with your friends. THANKS